Campaign for Lumien
Containing the remaining Kzinti forces at their last three border Battle Stations has given the much larger Klingon navy the opportunity to mount one major attack. The chosen target is quite deep into Kzinti space and will be an important staging point for the Klingon drive towards the Kzinti home world. The big cats are of course determined to defend Lumien and, in conjunction with their overall strategy, even if they don't succeed in holding it, they will make the boneheads pay dearly:

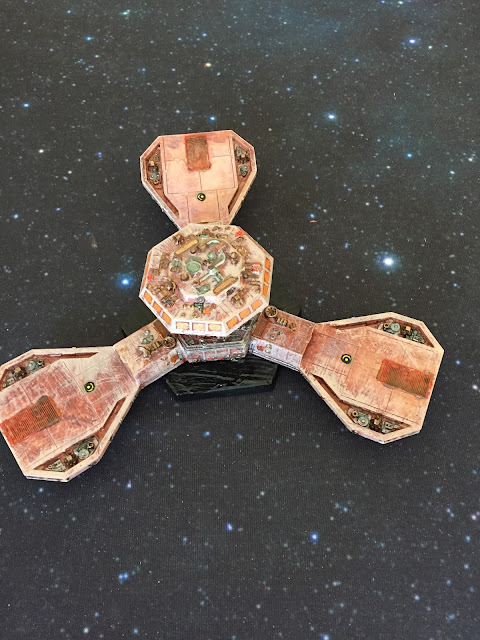
As usual, the Battle Mat shows the power the Klingons are bringing to bear. Their individual attack forces will not be as strong as the Kzinti defenders, but the Klingons are well able to outlast their opponents when it comes to attrition. So this will be yet another exercise in dancing with disruptors. And fighters. Oh, and planetary ground-based phaser-IVs.
One peculiarity worth noting here is that the demise of a previous Klingon admiral in the wreckage of his C8 Dreadnought has meant drawing a new chit to see the quality of this one, and unfortunately for the Klingons he is a -1. He probably just isn't up to the job of commanding a major invasion force, although of course nobody would ever doubt a Klingon commander's bravery. Especially when he is sitting on top of a Battle Tug. This will affect the stakes in attrition, because the Kzinti are led by the famous Duke S'Mau in the Dreadnought Hegemony, and he is a +1 Admiral, so there is quite a disparity. And for anyone reading this who knows the rules supplements for Federation and Empire, I have decided to replace major admirals at the front rather than drawing the chit at the home world; it seems a tad more like what would actually happen on campaign.
First Battle
The first probe goes true to form. The Klingons exchange fighters and light ships for Kzinti fighters before warping out to replenish. The attackers wipe out 33 Kzinti fighters, for the loss of 23 of their own, plus two E4 Carrier Escorts destroyed and another two heavily damaged. This is becoming a familiar pattern, with the Klingons losing fighters and light ships in the initial stages of a mini-campaign, while grinding down the Kzinti fighters. The games themselves tend to be quite short (1-2 hours) and enjoyable.
Second Battle
The Battle Mat, as always, has changed:

Both sides have fewer fighters and have replaced some of their front-line ships. Based on previous similar mini-campaigns at fixed points, there will come a point when the heavier ships start to take a pounding; it is usually just a matter of time before that starts to happen.
For the first time in the campaign, the deployment dice come up with an exceptionally concentrated Kzinti fleet, deployed to the right rear of the planet. Most of the Klingons are off on the diagonal away from them, with the planet in between. Unfortunately for the Klingons, a lone F5 squadron is best placed to take all the grief. Large numbers of drones followed by a fighter strike destroy both Frigates and heavily damage the leader ship. In the meantime, the Klingons are busily mopping up the closer planetary fighter squadron. The Kzinti then turn inwards, with a cruiser squadron comprising a Battlecruiser and two Light Cruisers coming in on the tail end of the Klingon Light Carrier group. The Kzinti destroy the F5V, making this the first Klingon carrier lost in the war, albeit a light one. However, for the first time in the battle this brings Kzinti ships close to the main body of the Klingon fleet, and their response is swift. The Battle Tug, in combination with their D6V Carrier and a D7 Battlecruiser, closes to range four on the lead Kzinti ships and cripples both Light Cruisers before the Klingon fleet warps out. In addition to the ships, the Klingons lose all of the fighters from the vaporised F5 Carrier, while the Kzinti lose almost an entire squadron from the planet.
Third Battle
Time for another pass:

The Klingons have shifted around their lighter vessels from the previous engagement, while the Kzinti replace their two crippled CLs with a couple of Drone Frigates. As you can see from the latest state of the Battle Mat above, both sides are well down in fighters, and the Kzinti are starting to feel the attrition overall.
This time provides more variation. The Kzinti do their usual in terms of attrition. They wipe out the remaining Klingon fighters and hurt a Frigate Squadron badly: an F5 is destroyed and another crippled, as is the squadron leader. The D6M takes heavy damage from a close pass by the Strike Carrier group and is forced to retire from the campaign as a result. The Klingons destroy another full fighter squadron, and just before they warp out they manage to get their Battle Tug and friends in close for a pass at the Kzinti Dreadnought, crippling it. The cat admiral sighs and moves his flag to the Strike Carrier.
Fourth Battle
More changes:

The Klingons are still able to replace their losses, while the Kzinti will field the same fleet as last time, minus a fighter squadron and their Dreadnought. The attrition is beginning to tell on them. However, this one is a rather desultory affair. Klingon fleet morale is low for some reason, and their main ships refuse to close on the Kzinti, which is probably just as well because of the way they have concentrated near the planet. The Klingons make a few probes and then leave rather quickly, losing the tradition sacrifice of light ships in the process: and F5J and F5 destroyed; an F5C crippled; and an F5 heavily damaged, in return for picking off half a dozen Kzinti fighters.
Fifth Battle
The Kzinti are unchanged from the last time, but the Klingons are beginning to scrape the bottom of the barrel, with four E4s taking part in this one:

Still, the Kzinti don't have much in reserve, so it will only take a bit of luck on the Klingons' part to force the issue to a conclusion. The Klingon offensive is hanging in the balance.
However, this time it gets nasty as the Klingons press the attack. The Kzinti fleet is not quite as concentrated in this engagement, but even so the usual pattern repeats itself, with the added spice of a determined push by a Wing of D7 Battlecruisers. The Klingons pay the price, with a D7 crippled and the other two heavily damaged. They also lose two E4s destroyed, with another heavily damaged along with an F5C. This does, though, give the Klingon command group the opportunity to make its traditional pass against something juicy just before leaving the area to regroup. The Klingons destroy two Drone Frigates and cripple a Fast Battlecruiser; they also destroy four fighters.
Sixth Battle
The Battle Mat tells all:

This is the part of the campaign where both sides are throwing whatever they have left at each other, which in this case means carriers without fighters are being drafted in to fill the line as cruisers. The Klingons have even had to deploy an F5S Scout Frigate to make up their numbers. The previous battle shows what can happen to valuable ships in these circumstances - the loss of two Drone Frigates has hurt the Kzinti. Okay, they are still only frigates, but the destruction of a couple of drone ships in return for standard vessels has made the Klingons happy. Who knows how it will pan out this time...
Viciously, as it happens. The Kzin Duke S'Mau is unwilling to close, hoping that missiles will drive off the Klingons with minimal loss to himself, but it really does not work that way. The Klingon ships dance gracefully just within effective phaser and disruptor range in mutually supporting groups as their main battle group, comprising the Battle Tug, D7C and D6D Drone Cruiser, starts to close the range. S'Mau sees a risky opportunity to force things to a conclusion and attacks the main body of the Klingon fleet. He manages to cripple a D6 Battlecruiser, but does not quite do enough to remove its companion from the field.
At this point, the Klingons go for it properly, concentrating on the famous Kzinti Duke. The Battle Tug and its friend move into very close range, since the carrier's fighters have already been wiped out by the D6 contingent, including a D6CV being used as a cruiser. The Kzinti Escort Frigate is forced to retire due to heavy damage, then the Klingons destroy the Escort Light Cruiser and cripple the flagship Strike Carrier. At this point the ground bases open up and inflict more damage on the remaining D6, and the Klingons head off to their rendezvous point. As the space dust settles, the Kzinti realise that Duke S'Mau is no more.
The Klingons lost a D6 crippled, another heavily damaged, and an E4 heavy damaged - a good result from their point of view, for a change; in fact, they almost managed to break the morale of the Kzinti fleet on this occasion.
Seventh Battle
Commodore S'Murrus, the officer from the Marquis' Fleet who destroyed a Klingon C8 Dreadnought in the skies over the neutral planet Zursk, now takes over as de facto commanding officer. There isn't much left in reasonable condition, but he scrapes together enough for another defensive engagement. The Kzinti really do not want to lose Lumien to the boneheads:

The Klingons are feeling the attrition too as they are forced to feed in valuable ships of their own if they are to keep up the pressure on the defence. This time they are using two D7C Command Cruisers and, for the first time in the war, a D7A Stasis Cruiser, as well as two F5S Scouts. Unlike the Kzinti, though, they still have a few useful ships in reserve. The Klingons don't really expect the D7A to use its stasis fields, but they can make use of its special talents as a damage sponge. It's not as good as a Mauler, but it will help - besides, it's one of the few assets they have left.
This time, the Klingons are fought to a standstill. The damage is spread across their lighter ships, with an F5 and an E4 crippled, and two F5 Scouts and an E4 heavily damaged. In return, the Klingons vaporise a Destroyer and heavily damage another. But it is not to be; the Klingons can no longer put together a full fleet, so they leave Kzinti territory. The big cats sigh in relief - they wouldn't be able to put together another fleet either! This is the first time there has been a stalemate in the campaign.

Comments
Post a Comment