Posts

The Lyrans are coming!
Image
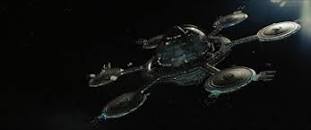
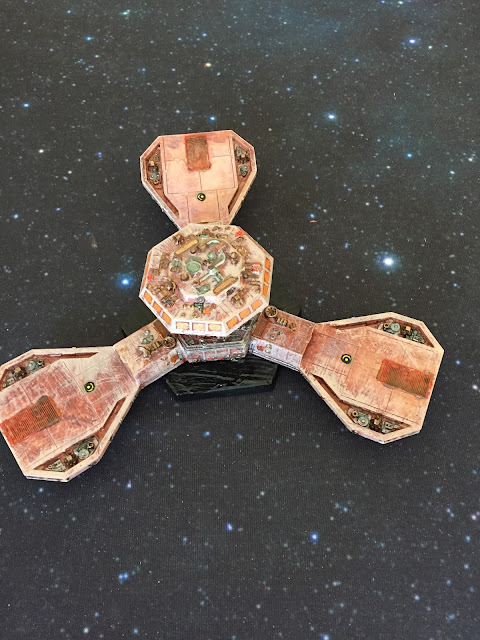
 Well, not quite - this is my attempt at a Battle Station. It would actually do for pretty much any of the major powers, but I gave it a base sandy color and stuck some Lyran Homeworld Clan markings on it: The Lyran decals have come out much more sharply than the Kzinti ones did, possibly because of the lighter background tones. And for some reason my stations always look manky rather than Star Trek pristine, but I like the well used look. The second photo shows more of the detail, of which there is a great deal indeed. The model is six inches across by two inches high. It came with a flight stand, but being made of resin the station was far too heavy to balance safely so I simply glued it straight onto its base. In any case its relative height means it will still fit nicely with my spaceship models. I'm getting quite a lot of painting done at the moment. Teaching has finished for this academic year, although admin and my own writing will keep me busy. Doing a colour every so often...
Fly me to the moon

Image
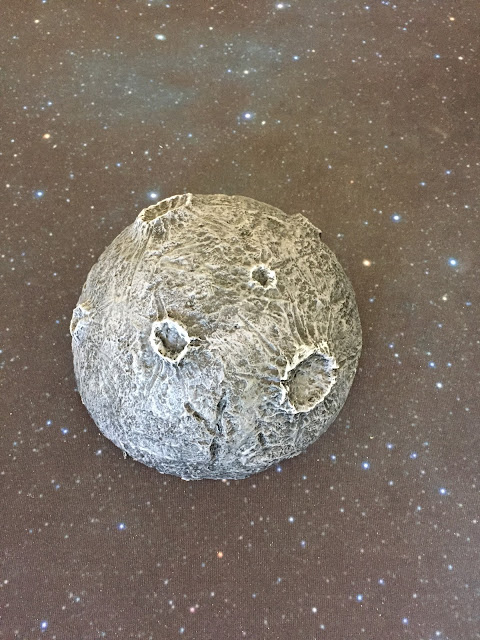
 And other places. These are resin pieces, 6" diameter, sold by Combat Zone Scenery in the UK, and very nice they are too. Part of their Armada scenery range, they are useful hemispherical planets of various kinds. Here's my attempt at the moon/planetoid/large asteroid one: In any tabletop space combat game the miniatures are going to be wildly out of scale when compared with model planets, but often we need something visual to do the job well. These fit the bill nicely. Jungle planet: I used gloss acrylics for the sea effect. You'll notice a couple of metallic building son the surface - the moon of Endor? In fact, the other two definitely show the Star Wars Armada theme:  Ice planet - aka Hoth. And yes, that is a representation of a dead Tonton at middle right. You can also see a destroyed At-At walker at the top of the photo. The details are fun, but they have to impressionistic. I think this one turned out well, to my surprise. Someone once told me a long time ago not ...

Defending our Starbase

 The Nagato  has not seen direct combat action for a while now, but I know that our time will come. It does so in the form of an order to accompany another of our New Light Cruiser class as pickets for a Heavy Scout Carrier/Cruiser, one of our former Galactic Survey vessels that has been repurposed for the war. Our first engagement against the Klingon offensive sees us stationed at the far port end of of the fleet. In conjunction with a New Heavy Carrier with F-111 heavy fighters, we see off a Klingon attrition group composed of 24 fighters and six gunboats. We exchange fighters before the Klingons warp out, saving their gunboats. Our second fight is rather more dangerous for us as our flotilla is paired with a New Light Cruiser squadron to take on the enemy command element. Their ships are extremely dangerous, comprising a Heavy Dreadnought, a D5X Advanced Technology Cruiser and a D5L Command Cruiser. We manage to damage their front shields, but at the cost of severe damage t...

Starbase Assault Phase Two

 I end up fighting in only one engagement accompanying the Victory , in which our group sees off three Federation cruisers, all heavily damaged. At this point I receive new orders: to report to the D7C Demonslayer  with the rank of Commodore. I will be in charge of a Battlecruiser flotilla for the next series of combats, although I am beginning to wonder how many that will in fact be: the attrition on both sets of forces is incredible. Now I am not in command of my own ship, but two D5W Heavy War Cruisers as well. We are assigned to mask the base while the remainder of the fleet engages the Federation ships. I deploy my formation with the two D5Ws in front of the Demonslayer  due to their superior shielding. We advance to just outside overload range of the station and perform the dance of death, a manoeuvre in which our ships do not move closer but instead use tactical moves to change shield facings. This inevitably gradually reduces the shields on our ships and I order t...

Starbase Assault Phase One

Image
 I take my place with the Rabblekiller  as one of two D5 Leaders assigned to accompany the B10 Battleship Invincible  in our attempt to reduce an Advanced Technology Federation Starbase. The approach battle was simple enough, but this fixed position will be difficult to tackle. I am not sure that we have the logistical superiority needed for such a task; against an "ordinary" Starbase, perhaps, but this one is a good 50% more powerful than that. A useful comparison view; from Deviantart Our first engagement goes well. The Flathead admiral is clearly one of their pre-war bureaucrats and we inflict a great deal more damage on their vessels than they manage to do to ours. We are in it for the long haul though, and our Admiral Ogir gives the signal for withdrawal as our fleet reaches the point where a viable assault on the base itself is no longer possible.  The second fight goes even better, although again we have to retire before engaging the base. Ogir's stated intent...

An epic campaign

Image
 It seems a long time since I began as First Officer of a Frigate. Now Captain of the D5L Command Cruiser Rabblekiller , I am tasked along with another D5L to front the Battleship Invincible  - in other words, to take any hits for her. The Eastern Fleet has been massively reinforced with a "swarm" of attrition units - 200 extra fighters plus another 18 gunboats, in addition to the already formidable force itself. In addition, a new wave of technology has seen the development of so-called "X-ships", advanced technology vessels with superior capabilities. We expect the Federation to deploy similar ships as we move to assault their main Starbase on the Eastern Fleet's sector.  Fighting has been going backwards and forwards in this region for years now and the wear and tear on the planets and Battle Stations is testament to the increasing severity of the war. Further to rimward, we have been able to maintain lines of communications with our Romulan allies. There are...

Death of the Baron

 The war against the Lyrans and the Klingons continues to be a cat and mouse game, with the front lines flowing backwards and forwards. In effect, it is stalemate, although the casualty lists continue to mount. So does the loss of heavy ships as the Lyrans destroy the Dreadnought Hegemony  and kill the Baron. His heir is ordered to replace him on our front by the Patriarch, and he turns out to be very able indeed, destroying a Battlecruiser and a Mauler Cruiser in revenge. There is no end in sight to the fighting and we know that our economy is about to crash as a result of over a decade of pressure. Fortunately, so will that of our enemies - and we have the economic force of the Federation helping us.

The Death of the Count

Image
 Count R'rorash is dead. A Lyran counterattack has crippled the Dreadnought Hegemony , killing our heroic leader in the process. The Baron takes over command of our forces against the Lyran enemy. Nobody doubts his bravery, but we are all aware that he is not of the same calibre as the giant who has lead us for ten years now. My command, the Light Carrier Tempest , is also destroyed in the fighting. A powerful Lyran command group hits us with ESG rams. Anticipating their move though, I manage to save most of my crew by initiating emergency evacuation procedures. Ships can (slowly) be replaced, but veteran officers cannot. We regroup and I find myself promoted to command of the Strike Carrier Sabre  by the Baron; he says he remembers my valuable contribution to intelligence about the new Lyran gunboat ships. This means I now command the largest carrier that originally belonged to the County; indeed, I fought my first few engagements as a fighter pilot in the same battles as thi...

Meerclaw and the Gunboats - Part Four

 The Count and I return to the main conference chamber. The fleet Captains greet our arrival with another shout of "Honor!" and R'Rorash calls the meeting order. He motions to the fleet's Chief Science Officer to begin. I remember C'Nisar from guest lectures on theoretical fighter and small ship designs from the academy; this should be interesting. He has a knack of making difficult information digestible to warriors such as ourselves. I also have more than a sneaking suspicion that his presence as main scientific advisor to the Count on the Lyran Front is no coincidence; no doubt he has had more than just a paw in the new fighter design I have just been shown. The Count notes my interest and his whiskers twitch in amusement. "Gentles," says C'Nisar, "My team has been tasked with analyzing the wealth of information provided by Ser Meerclaw and his Science Officer on the Tempest, Commander  C'Taia . The stratagem of pooling information from t...

Meerclaw and the Gunboats - Part Three

  Debriefing at Zamyan The fleet reconvenes at our recently reconquered planet of Zamyan, which also happens to be my home. Count R'Rorash calls a war council on the Titan  for all of the senior Captains, including myself. Also present is the Baron, who has been our Count's second-in-command for several years now due to his seniority as a nobleman and, most interestingly, the fleet's Chief Science Officer. He watches the proceedings carefully. The vid feeds play the course of events of our encounter with the new Lyran ships at their Battle Station, and the Count calls us to order. We all stand to attention and then the voice of the Patriarch of all Kzinti is broadcast into the room: "Our highest honor, the War Medal First Class, is hereby awarded to Captain Meerclaw, currently of the Light Carrier Tempest,  for audacity and initiative in the face of overwhelming odds. He not only saved two ships from the Lyran enemy, but has gathered military intelligence of such a sig...

Meerclaw and the Gunboats - Part Two

Image
 Our part of the fleet warps into position, with the Lyran Battle Station just off to starboard front. My Helm Officer is pleased with his efforts and justifiably so; the Medium Cruiser squadron is at our port and our two (New) Heavy Cruisers are screening us. As commander in our part of the battle, I have already set up a conference screen with the Captains of these ships. This turns out to be a useful initial precaution because it saves valuable time when we see what we are up against - and it isn't pretty. Our fighters are launched as per standard operating protocol. A quick viewscan shows that the enemy has committed large numbers of fighters in our vicinity. Off to our port they have a pair of War Cruiser class carriers, fronted by a Scout-class War Cruiser; this alone gives them two dozen fighters and a lot of phaser power, although they lack the longer ranged disruptor suite. Inside them is their main fleet command element: a Dreadnought, a Battlecruiser and one of their New...

Meerclaw and the Gunboats - Part One

  Captain's Log, Stardate 178.5.12 We are on approach to a Lyran Battle Station that has been placed near the site of one of our County's old border stations from before the war - the same one, in fact, that we defended against the initial wave of invasion almost ten years ago now. It feels strange to be revisiting this region. Much has happened during the intervening time. Our forces have managed to keep the Coalition at bay after their major assault on our capital planets destroyed much of our military infrastructure. Painstaking efforts have combined with timely financial aid from the Federation to stabilize our situation, albeit at great cost. Much of Kzinti space is now an open battlefield as fleets criss-cross in various attempts to advance beyond a stalemate. Our current strategic situation is quite good, with the combined Count's and Duke's Fleets now attacking towards the original border zones for the first time. The Marquis' Fleet is operating in conjuncti...

The Vudar

Image
 The various races and rules that have been appearing for Star Fleet Battles  since I originally played it in the 80s and 90s have mostly left me cold. This may simply be because I have not had a chance to play them. In any case, re-absorbing the game is taking enough of my time and energy. However, occasionally something happens in my ongoing Federation and Empire  campaign to change things around a little, and this has happened recently.  I have automated rules for the Andromedans who, unknown two the galactic powers, have finished constructing their network of rapid transit bases. It is now Spring 178 and the Andros are shifting their strategy to probes into the territories of the various empires. Mostly this is intelligence gathering, but they will go for a target of opportunity should it present itself. This has just happened with an Andromedan force raiding its way across Klingon space in the sensitive rear areas on the Hydran Front. The invaders came across an...

Kooth on the Romulan Front

Image
My new command, the Double Cruiser Ace , is transferred to the Romulan Front to fight as a Federation auxiliary in tandem with another cartel's Heavy Cruiser.  The DCR is a strange and ungainly vessel, an early attempt to produce a reasonably heavy vessel by welding two CR Light Cruisers together. Our option mounts are configured for plasma torpedoes; this will give me an opportunity to see an entirely different technology in action from warfare in the Kzinti or Hydran regions. In the event, our two ships are crippled when we come up against a major Roman command contingent; our sacrifice, however, permits the Federation ships to close against the other Romulans and win the engagement. Definitely a peculiar ship!

Meerclaw becomes a Captain

 Heavy fighting continues across our former territories as we fence mightily with the Coalition forces. Our homeworld itself seems to be safe, and the damage previously wrought to our infrastructure by the invaders has mostly been repaired; it is rumored that we have even been able to re-establish some defensive installations on the planets nearest Kzintai. I fight in several more engagements before being promoted to Captain of the CVL Light Carrier Tempest . Our previous captain is promoted to command of the CVS Strike Carrier Sabre , which has been crippled in one of the many combats that have been taking place. As usual, our forces allied with the County are facing the Lyrans, and it shows in the list of crippled heavy ships. Unfortunately, the Count's heir C'Rorish is killed in action as the Sabre  is crippled, so a replacement captain is needed. The toll among our crews and noble officers continues to be high; although we would not say that the situation has stabilized, w...

Rubik gets blown up

 Fighting continues to be heavy across Kzinti space, and my new command, the D5W Soulstealer , is one of the casualties. In conjunction with another of the new D5W class and a D6M Mauler Cruiser, we are targeted by an enemy CVA group, and our vessels pay the ultimate price. I am, though, able to mitigate the worst of our losses by giving the order to abandon ship before a huge drone wave impacts and vaporizes all three vessels. Our situation is not helped by our position well to the port of the main fleet, and although we avoid the incoming missiles for as long as possible, it really was only a matter of time. Our sacrifice, however, is not in vain as the rest of our force sees of the enemy in fine style - basically, we were used to attract their attention while our main thrust went in elsewhere. The timely order manages to save most of my valuable crew. The usual post-campaign logistics re-arrangements begin as the Kzinti Marquis' Fleet beats a hasty retreat. The D5C Rabblekiller ...

The Deathblow is destroyed

 I have to report the loss of my Orion Heavy Cruiser Deathblow  in action over the Hydran planet of Phthah III. The Hydrans are on the offensive now, driving towards their homeworld, and on the way Phtah III is liberated from the Lyrans. The Deathblow  is tasked with protecting a Hydran Tug carrying Scout pods, and the Hydrans use our vessel to absorb the ESG power of three Kyran War Cruisers. One can of course see an ESG ram being lined up, so we are able to abandon ship in plenty of time, but our ship's sacrifice saves the Tug. Our s is in fact the only loss on the Hydran side in the battle, because their cruisers are easily able to mop up the Lyrans in return. This is in fact a typical use of resources by the canny Hydrans; all they lose in the battle are fighters and our Orion auxiliary, while they force the Lyrans onto the back foot and secure Phthah as a forward base.

Haashaastaak is promoted

 The Romulans press their attacks beyond Midketh, attacking our depleted forces at one of the border Battle Stations. This is the next phase of their offensive: now that we have been forced back into our own territory, they will reduce the border stations before deciding where to strike next. As Captain of the Battle Destroyer Bonecrusher, I take part in two battles. Fighting is extremely intense, even by our standards, and  it is the heavier ships on both sides that pay the price. We lose a full carrier group as well as the station, but the enemy pays a heavy price: a Condor Dreadnought and a Vulture Early Dreadnought both crippled, with another Condor destroyed outright. As our forces retire and reform, I am promoted to Captain of the Battle Destroyer Leader Hunter .

M'rrr'shann at Midway

Image
 I take part in two engagements as we launch a huge assault on the Hydran Starbase that stands between us and their Old Colonies. Our forces are decimated in the attention, and the Klingons also take heavy casualties, as do the Hydrans. However, they manage to hold us off. For some reason their Starbase has been named 'Midway' in honor of a naval battle famous from Terran history; it remains to be seen whether this campaign is a similar turning point. The Dark Fury  is destroyed in the intensive fighting, and as a trimaran specialist I am given command of one of our clan's few War Cruisers, the Cold Fang . Image of a Lyran War Cruiser from Deviant Art.

Kooth at Midway

 The Coalition must have rebuilt their strength and repaired their warships after taking the Hydran homeworlds, because they mount an enormous offensive on the Hydran Starbase that stands between them and the Old Colonies. The little guys fight with an admirable combination of ferocity and tactical cunning as they fight off wave after wave of enemy attacks, shattering the Lyrans completely and mangling the Klingons as well. My cruiser the Deathblow  takes part in two engagements, strangely enough on both occasions facing off against other mercenaries. The first one is a newly-built Battlecruiser, the first time I have seen one of those. Our ship of course comes off the worse, but the exchange is followed up by a hail of hellbores from a Hydran cruiser squadron with full fighter support; the enemy drifts off, crippled. We are not so fortunate in our second fight, where again we are met with another Orion vessel, this time a CR Cruiser, and the shoe is on the other foot. We win ...